Linux: Install Storage Daemon and its Plugins
Note
When installing a plugin, BIM also manages the packages for its associated Bacula component (Director, File Daemon, or Storage Daemon). BIM installs the component if it is missing and may update it if it is already installed.
The following article aims at presenting the reader with instructions on how to install Storage Daemon.
Important
It is key to remember that:
It is possible to install plugins along with the installation of the component.
When adding plugins later, Bacula will launch the installation/upgrade process.
While going through the installation steps again, your configuration file will not be overwritten.
Prerequisites
General Prerequisites apply here.
Steps
Note
The versions and plugins shown in this example reflect those available when this documentation was last updated. This example shows all plugins; the Installation Manager displays only the plugins included in your subscription. Available options may also change as new versions and plugins are released. These differences are expected and do not indicate a problem with your installation.
Run BIM and install SD:
./bee_installation_manager -t SD
Confirm the Director and plugins installation with
Y.
=====================================================
Installation of Storage Daemon and associated plugins
=====================================================
Proceed with Installation of Storage Daemon and associated plugins? [Y/n]
Provide your download area address.
Note
To get your Download Area URL, go to your Customer Portal, click Your Subscription from the left menu, scroll down to the very bottom. You may copy your Download Area from Your Download Area section.
Please enter your Download Area URL. This information can be found in your Customer Portal in the "Your Subscription"
menu : https://www.baculasystems.com/dl/@@customer-id@@
Choose the version to be installed.
Available versions found on your Download Area for your current operating system [rhel7-64]:
---------------------------------------------------------------------------------------------
1 : 10.0.8     2 : 10.2.4     3 : 12.0.5     4 : 12.2.5     5 : 12.4.4
6 : 12.6.5     7 : 12.8.4     8 : 14.0.9     9 : 16.0.16   10 : 18.0.9
11 : 18.2.5
---------------------------------------------------------------------------------------------
Please, select the version of your Bacula Storage daemon ('18.2.5' by default) :
Choose the plugins to be installed (optional).
The following plugins available for the Storage daemon can be installed at version 18.2.5 :
---------------------------------------------------------------------------------------------
1 : aligned                2 : cloud-azure
3 : cloud-glacier          4 : cloud-google
5 : cloud-oracle           6 : cloud-s3
7 : cloud-swift            8 : dedup
9 : key-manager            10 : shstore
11 : single-item-restore
---------------------------------------------------------------------------------------------

Select the number(s) of the plugins you want to install, separated by commas.
Leave empty and just press <Enter> to skip plugin selection :
Proceed with Managing Firewall rules.
Note
Choose the default options proposed for the firewall setting, unless the policies of your company require different rules.
=======================
Managing Firewall rules
=======================
Proceed with Managing Firewall rules? [Y/n]

Available Firewalls
--------------------
  1 : iptables        2 : firewall-cmd
--------------------
Please, make your selection :  ('firewall-cmd' by default) :
Confirm the process with
Y.
=========================================
Ready to process the following operations
=========================================
[X] Installation of : bacula
[X] Managing Firewall rules

Continue or (r)etry? [Y/n/r]
Result
Bacula Storage Daemon is installed.
Installation of Storage Daemon Successfully completed
=====================================================
Bacula Enterprise Installation Manager. Done.
=============================================
Post-installation Suggestions
Verify Access to the Newly Installed Storage Daemon
If BWeb is installed and connected to the Director:
Go to BWeb.
Click “Storage and Media” –> “Storage Overview”.
Select the appropriate Storage resource from the “Storage” drop-down list.
Check that the page displays the Storage Daemon version and the expected devices.
The following example shows a Storage Daemon without additional storage plugins:
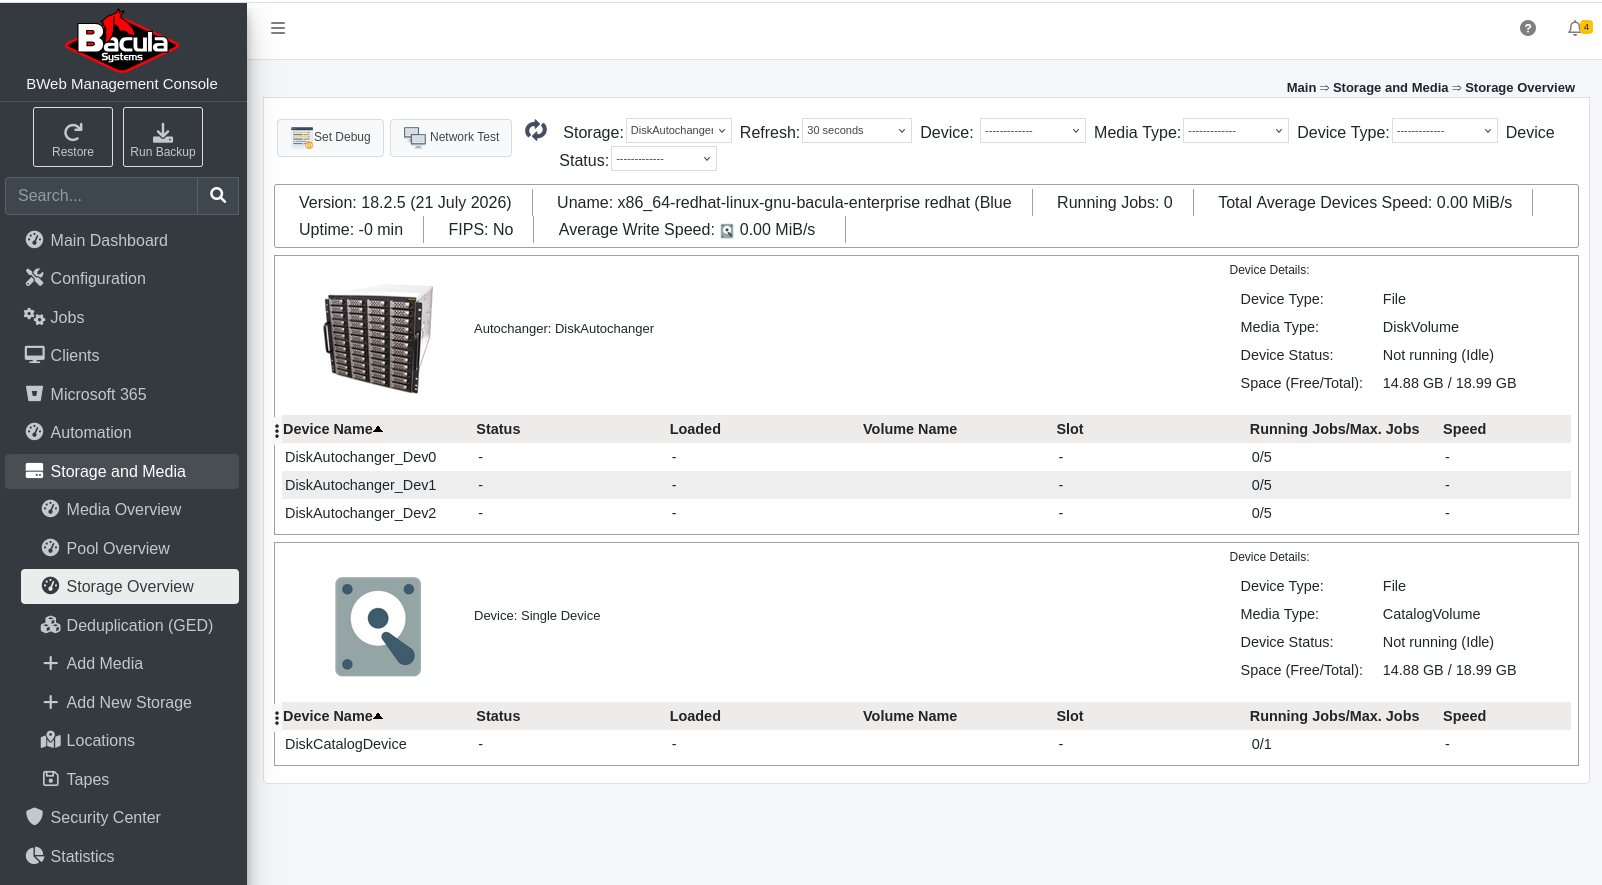
The page shows DiskAutochanger with three devices and DiskCatalogDevice
as a single device. Both display “Device Type: File”. The device status
“Not running (Idle)” is expected when no Job is using the device.
Note
The same operation is also possible from bconsole using
status storage=StorageName, where StorageName is the name
of the Storage resource already configured in the Director for
the Storage Daemon you want to check.
Verify the Plugin Loading on the Storage Daemon
Note
Plugin devices and the Drivers: and/or Cloud Drivers:
lines appear in the Storage Daemon status only when the corresponding
Device resources are configured to use those plugins, such as dedup
or cloud. Installing the plugins alone is not sufficient for them
to appear. This applies to both BWeb and status storage in bconsole.
Go to BWeb.
Click “Storage and Media” –> “Storage Overview”.
Select a Storage resource on the Storage Daemon where the plugins are installed.
Check the “Device Type” values for the configured plugin devices.
The following example shows a Storage Daemon with Cloud S3/Amazon and GED plugins and their devices configured:
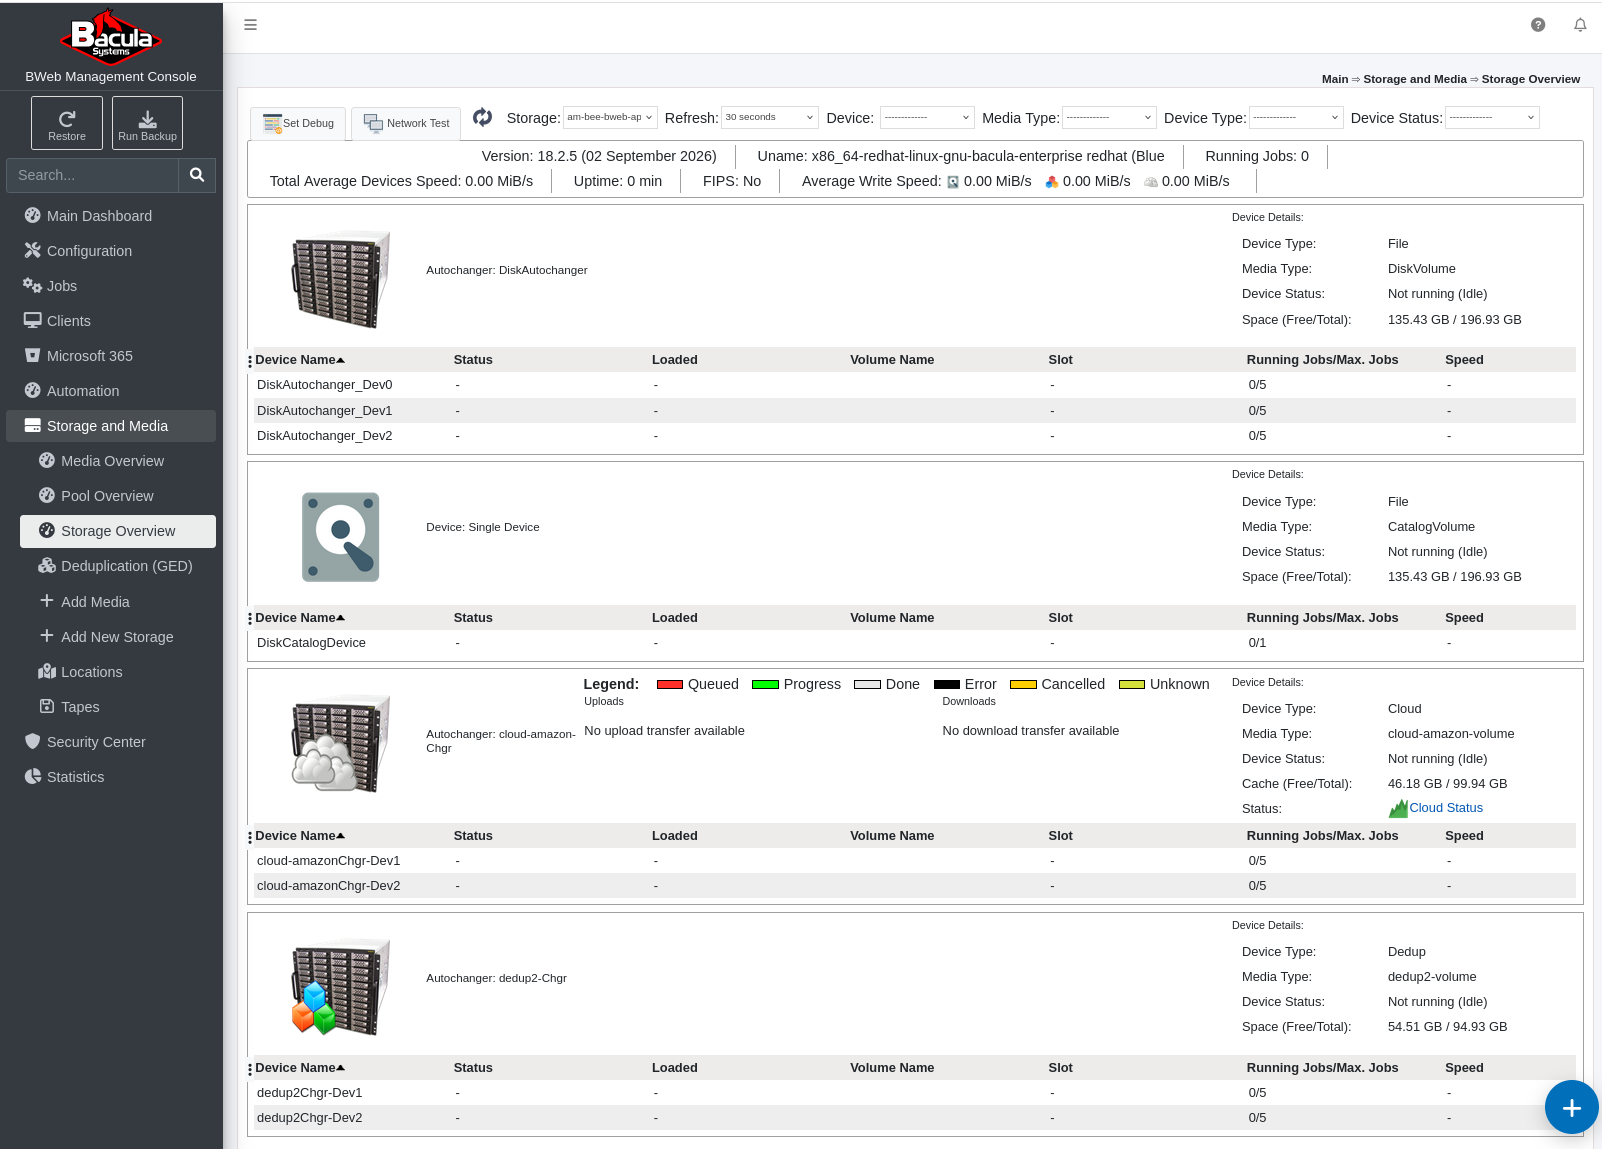
In this example:
cloud-amazon-Chgrdisplays “Device Type: Cloud”, local cache information, transfer information, and a “Cloud Status” link.dedup2-Chgrdisplays “Device Type: Dedup” and storage space information.The File devices remain visible alongside the plugin devices.
Note
The same verification is also possible from bconsole using
status storage=StorageName, where StorageName is the Storage
resource configured in the Director for the Storage Daemon you want
to check. Verify the expected drivers in the Drivers: and/or
Cloud Drivers: lines and the corresponding devices in the
Device status section.
See also
Previous articles:
Go back to: Linux: Install Components.